Git Basics
The complexity of Git can be intimidating, but it's a lot easier once you know which commands can be run at what part of the flow. The diagrams below will walk you through some common workflows. If you're not set up with Git yet, you might want to skip down to the "What's a Repository and Why Do I Want One?" section. There's also a table at the bottom with more commands.
What's a Repository and Why Do I Want One?
A repository (or repo) is basically a place to store the exact set of changes you want. Your finished code can sit over in a tidy pile (always ready to be deployed or shared), leaving you free to start construction on the next version. With Git, you'll have a "local repo" on your computer and a "remote repo" on GitHub (or Bitbucket, GitLab, or whatever web-based source control platform you prefer). Remote repos can be set to either public or private, and you can specify the permissions needed. As a sidenote, Git is free software (from Linux) that's installed on your computer wheres GitHub (acquired by Microsoft in 2018) is a web-based service. Other big players include Azure DevOps, AWS, and others, but GitHub is very popular and is probably better for getting started.
The best part of Git and other version control systems (VCSs) is that if you or someone else accidentally overwrites something, no problem...Git will help you get it back. Git is fairly complex, but that's so it can handle most any situation that comes up, such as when hundreds of people are working on the same codebase. No wonder it was created by Linus Torvalds, the same person who first came up with open-source software. When you're ready to try it out, skip down further below to see what's needed.
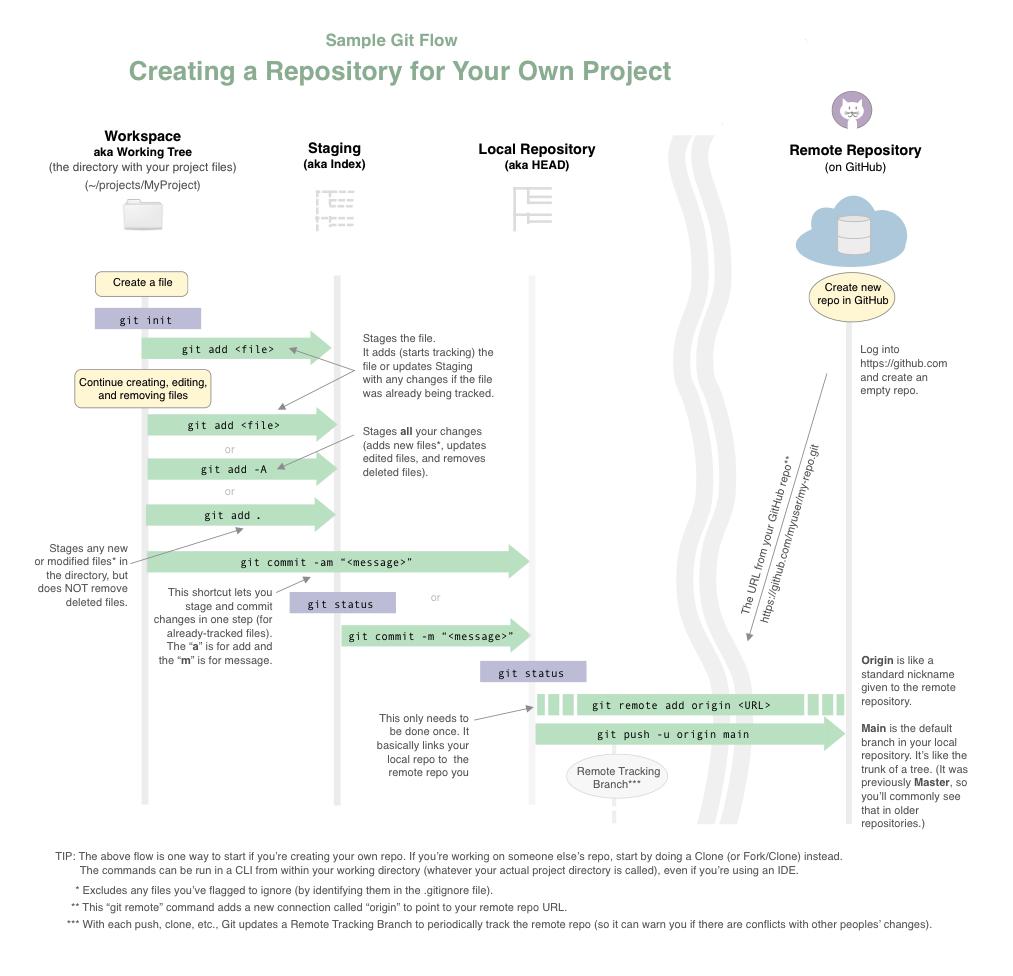
Creating a New Repository
Here's a basic flow for creating a repository (repo) for one of your own projects.
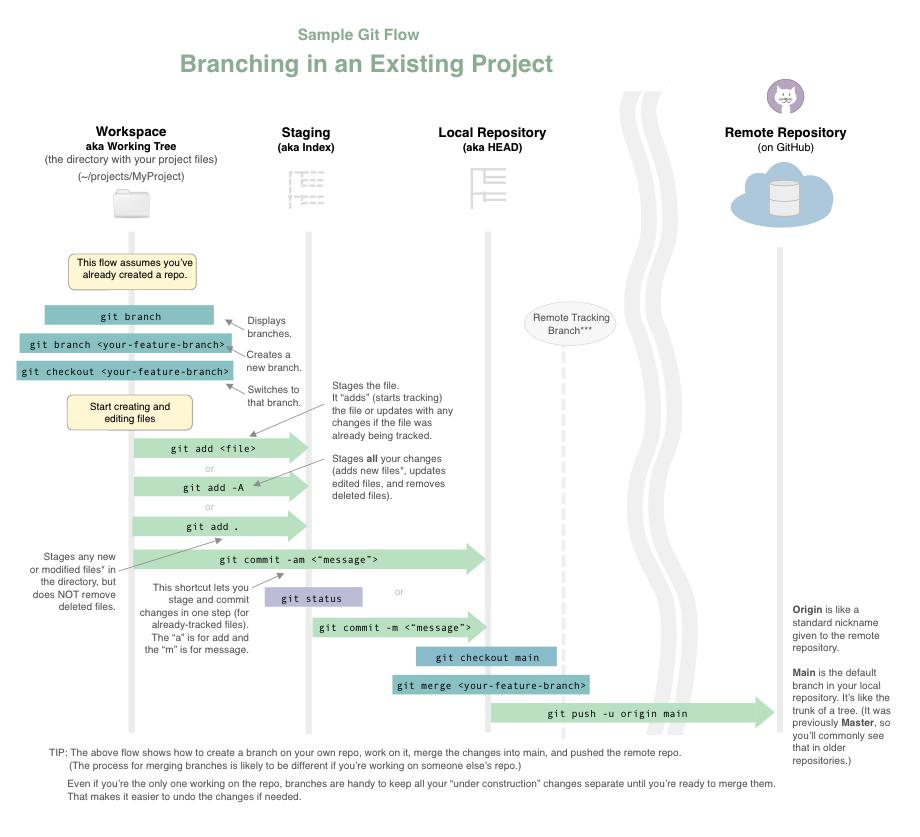
Branching
Have you ever saved different versions of the same document so that, if something goes wrong, you can easily go back to the previous version? That's essentially what branching is. It lets you store a group of changes together without updating your main branch until you're sure you're ready. This is especially helpful for situations where need to change several different related files. For example, to update this page to say "Main" instead of "Master" (to reflect GitHub's change) I'm actually changing multiple files (the HTML file and image files), and I want to keep those changes batched together. That way, it'll be easier to revert if something goes wrong when I deploy.
If you're just working on your own repo, after you've created a branch, made changes to it, and committed the changes, you can merge your branch into main before pushing it back to the original repository on GitHub. (However, if you're working with others on a shared repository, you'll probably be asked to follow a specific review/approval process before it gets merged. In those cases, find out what their process is and do some research on pull requests, etc.)
Cloning (or Forking and Cloning)
When you're ready to start contributing to someone else's repository (such as an employer or friend), you'll probably want to "clone" the existing repo so that you'll have a full copy of the repo on your computer. Then you'll probably want to create a new "branch" for your changes. The specific steps you take depend on the branching strategy your company uses. But essentially, creating a branch gives you a place to store your new features while still retaining the main branch (sometimes called master) separately.
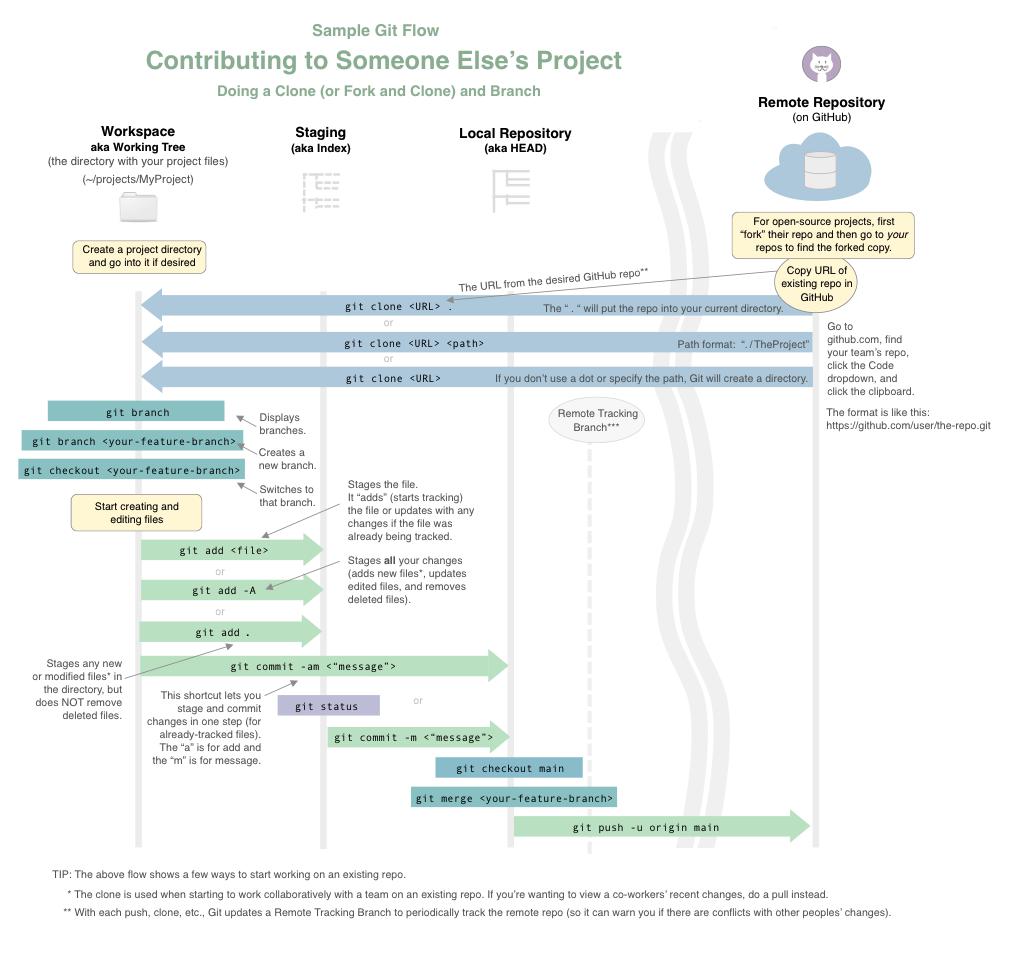
By the way, if you're wanting to work on someone else's open-source project, the general guideline is to first "fork" their repository (which creates a copy of it in YOUR GitHub repositories) and then clone that new copy. Otherwise you might get a permission error later when trying to push changes back to GitHub. You can read their guidelines in the ReadMe file for that open-source repo in GitHub.
Getting Started in GitHub
To get started, you'll need:
- A GitHub account (they're free)
- A shell/CLI such as Terminal, etc. (already on Mac/Linux) or Bash (which can be installed on Windows)
- A basic understanding of some Linux commands (so you can run commands from the right directory, etc.)
Then after a few configuration commands (see chart below), you should be ready to go. There are lots of tutorials available, and a list of the most common commands below (with examples).
Handy Git Commands
You can run these at the command line, such as by using Terminal (or by installing Git Bash if using Windows). If using an IDE to work on your project, you can either use the command line or set up your IDE's GIT plug-in.
| GENERAL | |
|---|---|
| Informational Commands | |
git status |
Feel free to run this frequently at various points to check your progress. This shows a lot of contextual info, such as your tracked and untracked files, whether you have changes that aren't committed, etc. |
git log |
This is handy when trying to make sense of your current predicament. ;) |
git help |
Just like it says. |
| Git Configs (usually only needs to be done once) | |
git config --global user.name "<First Last>"
Example: git config --global user.name "Paul Bunyan"
You can then verify with this: git config --global user.name
|
The name you want specified for your commits for all the repos you work on. This can but doesn't have to match your Git username. It can also be changed later (for subsequent commits). |
git config user.name "<Different Name>"
Example: git config user.name "Mr Bunyan"
|
If needed, you can set your name differently for specific repos. First go into the project directory so it will know which repo. |
git config --global user.email "<you@flymail.com>"
Example: git config user.email "chopper@flymail.com"
|
The email address to associate with your commits, etc. |
git config email <"mr.bunyan@workmail.com"> |
If needed, you can set your email differently for different repos. First go into the project directory so it will know which repo. |
| Commands You'll Run Once Per Project (not needed for existing repos on GitHub) | |
git init |
You'll initialize Git when you first start tracking files for your project. Run this command from within your project directory. It creates the hidden files/directories that will be needed for handling your new repo. | git remote add origin <URL> |
This connects your local repo to the remote repo. You can do this right before your first push. |
| MOVING CODE TOWARDS GITHUB | |
| When adding to Staging | |
git add <file> |
Stages the file. It "adds" (starts tracking) the file or updates Staging with any changes if the file was already being tracked. |
git add <file> |
Stages the file. It "adds" (starts tracking) the file or updates Staging with any changes if the file was already being tracked. |
git add -A |
Stages all your changes (adds new files*, updates edited files, and removes deleted files). |
git add . |
Stages any new or modified files* in the directory, but does NOT remove deleted files. |
| * TIP: Filenames that you specify in the .gitignore file will always be excluded from adds. | When Committing to Your Local Repo |
git commit -m "<message>"
Example: git commit -m "Implemented foreign currency"
|
This commits the changes and lets you enter a commit message (highly recommended) in one step. If you don't enter a message here, you'll still be able to enter it in a text editor, but it's not as convenient. |
git commit -am "<message>"
Example: git commit -am "Fixed a rounding error"
|
This shortcut lets you stage and commit changes in one step (for already-tracked files). The "a" is for add and the "m" is for message. | When Pushing to the Remote Repository (do both) |
git remote add origin <URL> |
This connects your local repo to the remote repo. If you've already done this (since I mentioned it above), it'll just give you a message indicating that. |
git push -u origin main |
This is the command that finally pushes your code to the remote repo on GitHub. |
| GETTING CODE FROM GITHUB | |
| When Cloning from the Remote Repo in GitHub (choose one) | |
git clone <URL> .
Example: git clone https://github.com/user/the-repo.git .
| The dot "." will put the repo into your current directory. |
git clone <URL> <path>
Example: git clone <URL> ./TheProject
|
And for the <URL>, you'd enter whatever the URL is like this:
https://github.com/user/the-repo.git |
git clone <URL>
Example: git clone https://github.com/user/the-repo.git
|
In this variation (without a . or a path), Git will create a directory for you based on the name of the repo. |
| BRANCHING & MERGING | |
| Branching Commands Before Your Changes | |
git branch |
Shows branches for this repo (Main or Master and any branches that have been made). |
git branch <your-feature-branch>
Example: git branch the-money-maker
|
Creates a new branch. Putting your new feature into a separate branch gives you flexibility to do things like doing a hotfix to the code that's in Production without having to worry about half-done changes you're making for your new feature. When using this command, you'll still need to switch to the new branch (next step) or combine both steps into one (by using the -b flag, see further below). |
git checkout <your-feature-branch>
Example: git checkout the-money-maker
|
Switches to the branch you specify. It's a good idea to run "git branch" afterwards to verify. |
git checkout -b <your-feature-branch>
Example: git checkout -b the-money-maker
|
Creates a new branch and switches to it. So it essentially does the previous two commands (above) in one step. |
| Branching Commands After You're Done Making Changes (do both) | |
git checkout main |
Switches back to main. You'll do this before merging your committed branch changes into master. It's a good idea to run "git branch" afterwards to verify. |
git merge <your-feature-branch>
Example: git merge the-money-maker
|
Merges your committed branch changes into main (or into whatever branch you're in when you run this command). Then you'll probably want to push to the remote repo. |